
Got a pair of gently worn oxford shoes that look a bit boring to your taste now, but you’re not ready to throw out yet? Got an old scarf or piece of fabric that you never use but also is too pretty to give away? Then let’s get a little handy with a fabric glue and combine the two pieces together and make a pair of fabric accent oxford shoes :)
This DIY took me about 1.5 hour to do, but I think it’s because I was slow and was thinking a lot about how to do it properly. I did use a little bit of tracing paper and muslin fabric to aid me with the correct “pattern” measurement, so that took a while. But the actual “doing” itself took about approximately 20 – 30 minutes. It’s definitely a good beginner – moderate DIY project; beginner because it only requires glue and scissors as the main necessary aid objects, and moderate because the pattern itself needs to be precise. But don’t worry about it too much and you’ll be surprised to see the final result (like I did)!
 1. I started with my rather scuffed, scratched, and moderately worn out Dolce Vita for Target oxford shoes. It was good walking shoes and all, but lately they look a bit boring to me. I was looking for inspirations to spice them up at Refinery29.com, as well as some DIY sites when I initially decided to paint the shoe tongue, all the way to the front tips. But then when I rummaged through my accessories drawer, I pulled out my old, close-to-never-worn fabric head band / scarf / belt. And then my plan just became much simpler.
 2. I used a scrap tracing paper and a little of muslin to draw out how much fabric is needed to cover the front middle part of the shoes.
It depends on your shoes, but I think if you have two pieces of 12″ x 4″ fabrics (or one 12″ x 8″ fabric), you’ll be just fine. Mark your patterns as necessary (depending on how pointy your shoes are, the bottom part can be a bit challenging at first). I especially have to make one exception to the width of the fabric: when the fabric goes between the two throat line points of the shoe, the width was a little bit smaller. This was necessary to make the fabric smooth all over the surface of the shoes. (If you aren’t sure what I meant by “tongue” and “throat line”, here’s a good guide.)
 3. Cut out your two fabric pieces. Similar like seam allowance, make sure to leave room for a little bit of fabric to fold inward towards the wrong side of the fabric (if you want smooth edges all over). The excess fabric at the top part can be glued over the shoe tongue, so it’s like you’re wrapping the tongue of the shoes. With these in mind, get your fabric glue ready.
4. Glue them! Remember that the bottom part (where the fabric touches the welt of the shoes), the throat line, and the top part of the tongue can be a bit tricky for gluing the fabric (especially if you want a clean, smooth appearance, so take your time and don’t get stressed out when your fingers start to get sticky. The fabric glue also tends to dry out quickly and bonds strongly, so make sure everything’s in place the way you want it to be on the first try. No pressure.
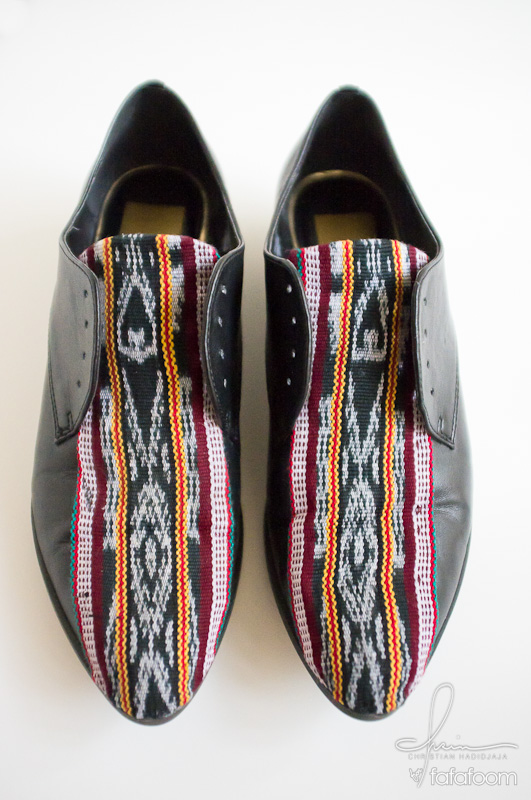
5. Examine your work and greet your new pair of shoes! I was really happy with the end result; I thought it was super cool although not 100% perfect :) At first I was a little skeptical about it, but looking at the result, I was really happy that I didn’t take a step back.
I mean, look at them! They suddenly become cooler and soulful.

Have you done any DIY that accentuate your shoes? To be honest with you, I made this DIY right after browsing through Missoni for Target collection :) What an inspiration, eh?
And yes, I’ll be at my local Target store at 8 am tomorrow,
Musank
Really liking the new look. The choice of fabric is great for the accent :-)
Thank you Agy! I just wore those shoes again the other day :)
Thank you so much, Agy! It’s actually an Indonesian textile, not 100% sure from where, but perhaps Sumatra island. I really love those shoes; I wear them very often to work and local fashion events.