
A friend gifted me a black long-sleeve lace dress that was cute but ill-fitting. Refashioning this dress with a black chiffon halter top, the DIY fringed lace dress is now ready to party!
I am happy, proud, and humbled of when this DIY black lace dress was finished. It’s the hardest I’ve done, personally a lot more taxing than Scarf Top with Kimono Sleeves and Shibori Dye Skirt. But I’m still here; a delighted survivor (YES!) to tell all the DIY lovers with limited sewing skills that you learn tremendously by tackling increasingly difficult projects. This DIY fashion project was hard for someone of my skill level, but it’s super worth it in the end. Let me tell you the story.
The concept was really simple at first: I wanted to combine my black chiffon halter top from H&M with a black long-sleeve lace dress I got as a gift from my best friend. Black Dress Refresh from P.S. – I made this… gives a very similar idea. I was to cut the attached scarf part from the halter top and cut the long sleeves from the black lace dress. After that, sew the lace dress on top of the black chiffon halter top. It should take about 4 hours max. with the hand stitching. Easy, right?
The picture below shows the original state of the halter top and the long-sleeve lace dress, plus my FINAL sketch for this DIY black lace dress. Yeah, it’s not the best sketch in the world, but thanks to Chris Hart’s Fashion Design Studio book, I finally took my first step to better my fashion illustration skills. Oh, and that grass-like lines are meant to depict fringe :) Obviously, this sketch looks different than the original concept I described previously. Well, more on the sketch’s backstory below.
[shashin type=”photo” id=”9000″ size=”xlarge” columns=”max” order=”user” position=”center”]
At first, things started to go briskly. I took out the scarf from the halter top and used it to fix the neckline of my wrap dress. Now the halter top is clean and free of unnecessary attachments.
[shashin type=”photo” id=”8999″ size=”xlarge” columns=”max” order=”user” position=”center”]
The challenges started shortly after I cut off the sleeves from the lace dress. Since I don’t have a dress form, I put the halter top on, then layer the lace dress on top of it in order to start pinning the dress to the top. Two problems arose immediately:
1. If I pin the dress as-is, the neckline would look horrendous (trust me), so I needed to make a sweetheart neckline out of this lace dress. And I have no sweetheart neckline dress or top (great).
2. The dress is apparently not long enough for me; it’s more of a tunic for this tall girl.
After some internal deliberation, I stuck with the original idea of creating a dress. Therefore, I needed to add more length to the bottom of the lace dress. But then the bottom part of the dress wouldn’t have lace! That wouldn’t be cool! That’s where I added fringe at the bottom part to the final sketch. After all, imagining the fringe movement while walking or dancing in this dress is very irresistible. Now you understand why the final sketch looks the way it is.
So I gathered some more materials, and the final list of items to make this DIY black lace dress is the following:
– the black chiffon halter top
– the black lace dress tunic (note: fabric has a slight stretch)
– 7″ long of stretchy black fabric to add length to the bottom of the dress
– 2.5 yard of 5″ long black fringe
– black thread and needle (yup, no sewing machine…it’s all hand stitch this time)
– black ribbon to help suspend the finished dress on a hanger
Making the sweetheart neckline out of the lace tunic was a nightmare. Stretchy lace fabric is rather tricky, and not having a dress form only added the difficulty level. I had to redo the curves and re-try the lace tunic many times, but at the end I settled with sweetheart neckline curves that look good enough even though they’re not symmetrical.
[shashin type=”photo” id=”8998″ size=”xlarge” columns=”max” order=”user” position=”center”]
Below are just some glimpses of my nightmare unfolding during this particular process. After a while, I just concentrated on making it happen and not worry about taking pictures. Plus, I only had time to devote myself to this project for roughly 3 hours max. daily. Not documented in the pictures are when I finally separated the halter top from the lace tunic and worked on the lace tunic itself. For finishing, I tucked in the raw edges and carefully did slanted hand stitch all around the neckline and the back area.
[shashin type=”photo” id=”9001,9002″ size=”medium” columns=”2″ order=”user” position=”center”]
When the sweetheart neckline was done, I was really excited. The hardest part was over! Now the second hardest part began (yay). Pinning the lace tunic to the chiffon halter top was a bit difficult because the black chiffon has a gathering detail going to the “choker” section, both front and back. That means I had to put on the halter top one (or three) more time, layer the lace tunic on top of it, determine the center back and center front, then pin the two pieces together. Thankfully Chris helped me pin the back part. More hand stitching commenced. No pictures during this time either (focus, focus).
Thankfully, the lace tunic has a lining already. I have a black glittery stretch polyester shirt that I purchased from a San Francisco thrift store at Valencia St. a while back, so I cut 7″ long from the bottom of the shirt to add the hem length. Modifying the width and attaching the black glittery fabric to the lace tunic’s lining were done pretty gracefully without much accident. But it’s worth noting that by this time, I was in a high alert mode…I surely did not want to have an unforeseen accident when I was that close to the finish line.
Below is the picture of the dress when the black glittery fabric was added.
[shashin type=”photo” id=”9004″ size=”xlarge” columns=”max” order=”user” position=”center”]
Why did I need 2.5 yard of black fringe? Because I wanted to have 2-tiered fringe for this dress. I started with the bottom tier first, placing and pinning the non-stretch fringe when I tried on the dress. I had the edge of the fringes to hang 1″ below the glittery fabric. The next picture was when I was done hand stitching the bottom tier and started pinning the top tier.
[shashin type=”photo” id=”9006,9007″ size=”xlarge” columns=”max” order=”user” position=”center”]
Since the black glittery fabric and the fringe add weight to the dress, I don’t want the top part (lace and chiffon) to rip apart easily, so I attach some black ribbons to help suspend the dress when stored in my closet.
[shashin type=”photo” id=”9008″ size=”xlarge” columns=”max” order=”user” position=”center”]
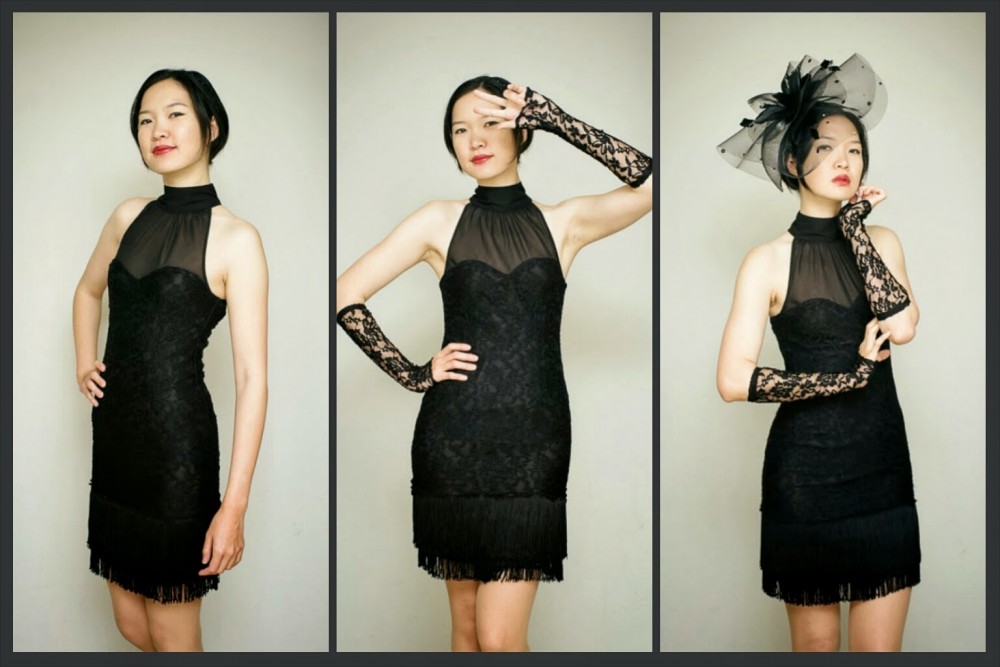
And with that final step done, I crossed the finish line…..oh my gosh, what a journey! I couldn’t stop smiling from ear to ear when looking at the dress on the hanger…it looks more fantastic than I imagined! My gosh, let me model it for you:
[shashin type=”photo” id=”9056,9057,9058″ size=”xlarge” columns=”max” order=”user” position=”center”]
What do you think? Words cannot express how relieved and happy I am with this dress. Oh, yes, the fringe movement. This is why this dress is so fantastic for dancing:
[shashin type=”photo” id=”9055″ size=”xlarge” columns=”max” order=”user” position=”center”]
Do you feel it? So cool, right? Oh my gosh, it’s so pretty.
Anyway, on the same night I finished the dress, I revisited the discarded lace sleeves. Well, I happened to have a little bit of black elastics, long enough to make two circles for my right and left forearms. So! Let’s make a pair of lace gauntlets (fingerless gloves), shall we? I custom made them so they fit perfectly for each of my arms. The left one is slightly smaller in diameter than the other.
Here are the pictures of the lace gauntlets (or 1/2 gloves, whichever word you prefer):
[shashin type=”photo” id=”9064,9065,9059,9060″ size=”xlarge” columns=”max” order=”user” position=”center”]
Last but not least, I finally had the chance to wear this Fantasia fascinator from Whittall & Shon Hats. It’s the perfect companion to glam up this outfit to the next level. I had the pleasure of owning this gorgeous fascinator for a while, and now I’m really happy to finally have the dress to match it.
[shashin type=”photo” id=”9061,9062″ size=”medium” columns=”2″ order=”user” position=”center”]
[shashin type=”photo” id=”9063″ size=”xlarge” columns=”max” order=”user” position=”center”]
Wow. What a ride; an initial assessment of 4 hours became 20 hours, plus the repeated fitting and seemingly endless hand stitching. I now feel like I cannot put off buying a dress form much longer; part of what made this project so time consuming was the lack of one. Nevertheless, with all of its challenges, the result of this DIY Black Lace Dress is something I’m quite proud of.
Do you know the song “Save The Last Dance For Me”? It begins like this:
You can dance every dance with the guy
Who gives you the eye, let him hold you tight
You can smile every smile for the man
Who held your hand ‘neath the pale moonlight
But don’t forget who’s taking you home
And in whose arms you’re gonna be
So darlin’, save the last dance for me
Throughout this project (that means pretty much the whole December), that pleasant song was stuck in my head, ironically saving me from the endless streams of Christmas songs if I dared venturing out to any public places with music players blasting. So I sang along happily, but I deliberately changed the last line to “So darlin’, save the lace dress for me” =D Cha cha cha!
One more time: the halter top, the lace tunic, fringe and the hand stitching:
[shashin type=”photo” id=”9124″ size=”xlarge” columns=”max” order=”user” position=”center”]
Happy New Year everyone, hope 2014 brings you both greatness and kindness to share with those around you.
Until next time,
Musank
Gorgeous!
Thank you Mandy! Happy New Year to you =D
WOW that is seriously impressive. Can’t wait to see it in person!
Thank you Cynthia!! That means a lot coming from you =D