
After several garment and accessories fabric dyeing DIY projects (or more accurately, attempts), I can confidently brag that I am so NOT an expert on this stuff. Fabric dyeing is, while fun, time consuming. That being said, I decided to do this post to share fabric dyeing tips, both from what I learnt from experience and more tips I found that I will try next time.
So far, I have only done my fabric dyeing DIY projects using Rit Dyes. I now know that using Fiber Reactive Procion Dyes for natural fibers (such as cotton, rayon, hemp, silk, etc.) is WAY MORE recommended for more vibrant, permanent colors, so that’s something I’ll do next time (hello soda ash and urea!). Color vibrance notwithstanding, I think there are still tips to be shared outside of the actual dyes used.
1. The right detergent and dye fixative can make a lot of difference.
I cannot recommend enough Synthrapol Detergent and Dye Fixative from Dharma Trading. Using these two detergents for pre-wash and post-dyeing wash really helps setting the fabric dye long-term as long as you wash them with cold water.
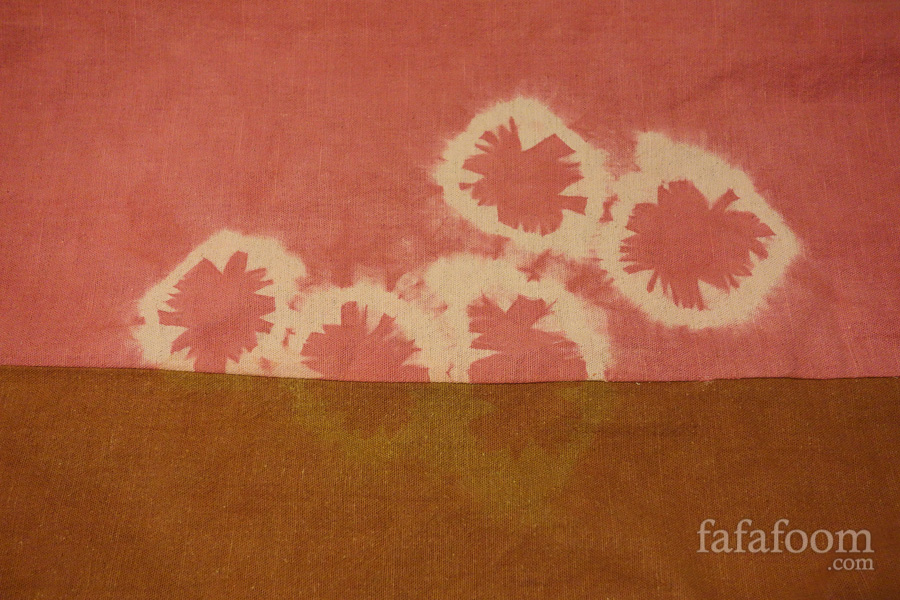
Before using these two saviors, I accidentally mixed a finished dyed fabric with the rest of my laundry load. Dyes bleeding everywhere. I almost cried, but then decided to toughen it up and re-dye the fabric, shibori dye style. The result is the picture above.
[shashin type=”photo” id=”6237″ size=”medium” columns=”max” order=”user” position=”right”]
2. Use flat plastic storage container for sink/tub/bucket dyeing.
For fully submerged fabrics dyeing, I rely on stove top dyeing and sink dyeing (definitely not a fan of the washing machine method). Stove top dyeing is more reliable for more saturated colors because you can control the heat and constantly stirring (don’t forget adding the salt!).
On the other hand, if you want to experiment more with color intensity and/or want to do ombre dyeing, I suggest doing it in the sink/tub/bucket. But even better, buy one of those flat plastic storage containers (I got mine from Target last Christmas season; the ones you use for storing your clothes underneath the bed), so that you can fully submerge your fabric flat (see picture above right). Hottest water possible is still a requirement in this sink method and since it will gradually cool down, the flat plastic storage helps distribute the dye evenly fast.
Yes, it’s a bit of a pain discarding the water, but you can be sure the dye is distributed evenly without not much stirring (you still need to do so, though). Oh, and salt addition is not to be forgotten :)
Note to self: When I have the fiber reactive dyes, try the tub dyeing.
3. If you are going to touch your fabric in any way, wearing gloves is the way to go.
Seriously, you don’t want to get those dyes staining your fingertips and nails like some zombie wannabe. I’m not a fan of those disposable plastic gloves because they’re kind of a pain to put on, but they are totally worth it. And don’t think you’re going to be fine if dye water accidentally fills your gloves. I have experienced a day or two in which my left hand had cherry colored dye stains (so it looks like I was a rejected bleeding extra for World War Z) because the dye water accidentally get inside my glove repeatedly while I was stirring the garment, and my right hand appears perfectly fine.
4. Tie Dyeing is so much fun and such a highly rewarding project for all ages, but remember to save the rubber bands for further use.
Tie dyeing used to be my “nemesis” because I did an epic fail during a shibori dye project in junior high. I didn’t tie the rubber bands tight enough, and I didn’t even put a lot of rubber bands in there in the first place! So more than a decade later, I redeemed myself with several tie dye projects….and I realize there are so much more experiments to do!
[shashin type=”photo” id=”6235″ size=”medium” columns=”max” order=”user” position=”left”]
I do mostly shibori dye technique so far, with the rubber bands wrapping and tying around buttons, rocks in the fabric, so they give irregular, but predictable shapes. It’s up to you if you want to cut the rubber bands after you’re finished with them, but I always save them for future reuse. If you’re saving them for future reuse, just be careful when untying them so you don’t damage the fabric.
The picture below was taken after I finished dyeing a men’s shirt for a skirt (but that’s a story for another post).
[shashin type=”photo” id=”6624″ size=”large” columns=”max” order=”user” position=”center”]
There are just so many tips out there that I like; the one from Dharma Trading (scroll down to see “Tie-Dye Instructions” below the product description) and Dope Tie Dye tips are great starters. I personally have never let the garment sit for 24 hours before washing them, but I will start doing that for future projects. And if you want starter kits, they have those handy, too.
One more final thought: for me, it’s not a question of “how much dye do I need?” for these projects. You can judge how much you need and experiment as you go along. It’s more of a question of “how much WATER do I need from start to finish?”
While you can measure how much dye water you need based on the total fabric surface area you’re dyeing, the total amount of water I spent during my approximately one hour (on average) period from pre-wash to post-dye wash makes me cringe.
I tried not to use that much water for fabric dyeing projects, however it seems that it’s a given that fabric dyeing consumes so much water. If you have tips or tricks that can help me reduce the water usage, please let me know!