
Summer means piles of DIY projects for me. And why not start with something simple, like this Fringe Sandals DIY that took me about 2 hours to make, only because I was too afraid to make mistakes of using E6000. Hey, I haven’t been using that super glue since last year, so I was pretty apprehensive with it since the sandals and fringe are all black and a yellow stain would not look pretty at all.
Actually I lied. It took me two hours AND an overnight, because I was waiting on the fringe trims to set up properly. More in that in a second. I’m sure that most of you DIY-ers are much faster than I am, so I think it will take you one hour at most (the overnight part is optional). So let’s get this over with, shall we?
My inspiration is these Steve Madden Sandals (you probably have seen it on my Pinterest board DIY Fashion Ideas). I saw my colleague wearing the brown version last year, and the idea to do similar update to my own old-ish Rocket Dog sandals stuck in my head for a while. So here I am, a year later, finally executing the idea. Better late than never :)
For this quick project, my materials were:
- My old Rocket Dog black suede sandals (covered heels at the back, thong-style at the front).
- 1.5 yard black velvet fringe trim (costed $5 at my favorite Fabric Outlet store at Mission St).
- E6000, but you can definitely do with fabric glue or your other super glue of choice.
- Scissors
- (optional) Masking tape
- (optional) Clothespins (I bought them at Daiso for $1.5)
[shashin type=”photo” id=”6241″ size=”xlarge” columns=”max” order=”user” position=”center”]
Sorry for the blurry picture; it’s hard to capture details with my phone camera when it’s all black! But I believe this is the only blurry pic I took :) See my notes at the end of this post.
Then I measured about 1″ from the top of the sandals and glue the bottom circle of fringe trim around the one sandal. This is completely optional, but I used masking tape to help me trace a straight line all around. I personally found it helpful because of the slope near the front part of the sandal. Cut the fringe trim when finished. Repeat for the other sandal. Below is the process and the finished bottom circles.
[shashin type=”photo” id=”6242,6243,6244″ size=”xlarge” columns=”max” order=”user” position=”center”]
Then I repeated the same process for the top circle, carefully positioning it right on the edge of the sandals. Now this is where the optional overnight came in. I used clothespins to help me keep the glue intact at the awkward sloping at the front of my sandals and left them that way overnight.
[shashin type=”photo” id=”6245″ size=”xlarge” columns=”max” order=”user” position=”center”]
But when I was checking my work, I was thinking, what if I put a button at the front? So I selected some button candidates and ran the idea to a good friend of mine.
[shashin type=”photo” id=”6246″ size=”xlarge” columns=”max” order=”user” position=”center”]
And this was initially unplanned, but she seemed to like one button style really strongly so I sew them in.
[shashin type=”photo” id=”6247″ size=”xlarge” columns=”max” order=”user” position=”center”]
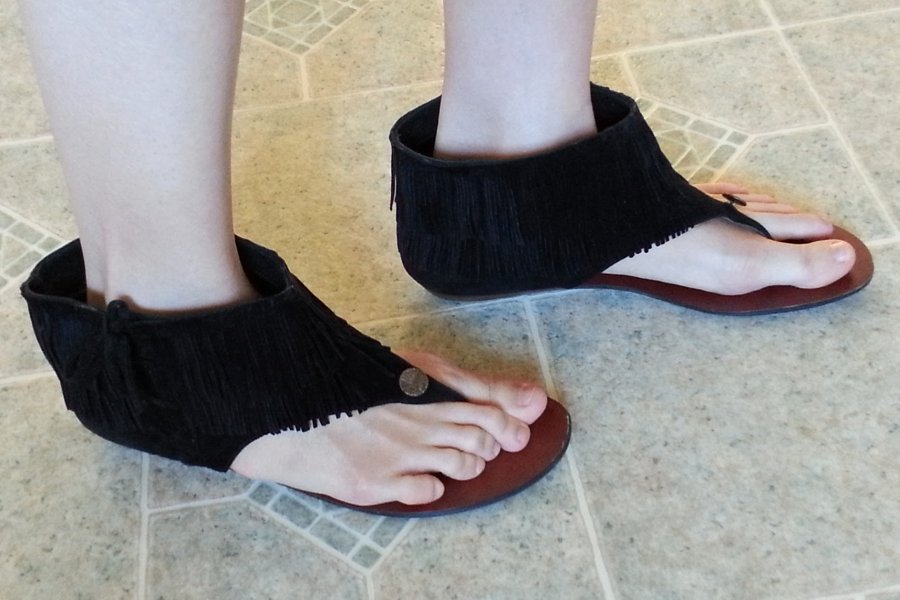
I’d say she made a good call :) Here’s my new fringe sandals! And yes, my feet are so white. It’s good contrast, you know?
[shashin type=”photo” id=”6248,6249″ size=”xlarge” columns=”max” order=”user” position=”center”]
Not too shabby if I may say so myself. What do you think?
More DIY projects await me,
Musank
Notes: Frequent readers may notice I don’t have the usual “fafafoom.com” watermark on the pictures, and the picture quality isn’t as good. The reason is that I was solely using my phone camera to do the pictures and then uploading them directly to my Google+ album. Any post-editing was done there. While it saves some time getting the pictures “arrive” at their designated album faster, I’m not exactly fond of the picture quality. I will see if this new process is worth keeping for DIY Project posts, so stay tuned!