
I’m sharing a tutorial of how I make my DIY business cards. They’re simply made with card stock papers and wallpaper or leather samples I get from FABMO, a fabric rescue organization.
Some of the regular Fafafoom readers and those I have the pleasant opportunity to chat with during local fashion events know that I make my own business cards. I have always liked the idea of having a “just enough” number of business cards on hand, and I dislike having 300 cards lying on my desk, reducing their numbers very slowly at a time. Of course this is not an option for everyone, less so for full-time media / press members who do business card exchanges every day, but it suits me well. I like making my own business cards, hand written and assembled with my own hands.
When I hand them out to people I just met, they have been proven to be an effective tool to instantly brighten the mood. This is totally priceless for events where business card exchange opportunities are many, such as this year’s J-Pop Summit Festival. It’s so amusing to see these cards present their “entertainment” value when people start feeling up the card’s back texture. Since I make them with wallpaper or leather samples, the cards have different textures on the back, depending on what materials I use at that time.
Since I get such great responses from nearly everyone who have come into contact with my Fafafoom business cards, I’d like to share how I make them with you. It turned out that I completely ran out of them anyway, so it’s the perfect timing to document the process. Perhaps you’ll be inspired to create your own personalized creations with stock paper and samples this holiday season!
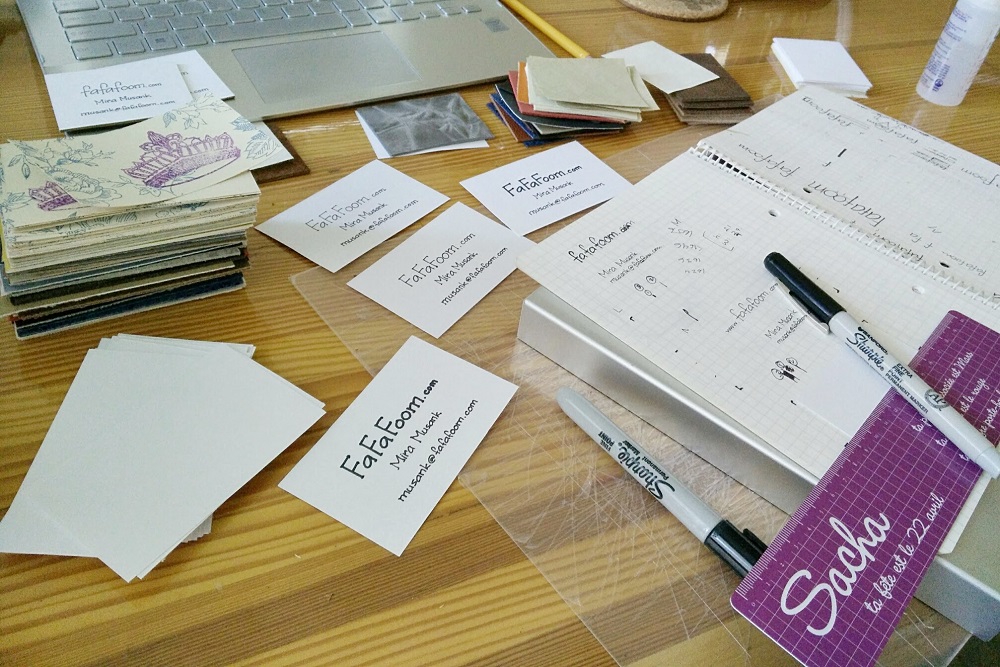
List of Materials
[shashin type=”photo” id=”19014″ size=”xlarge” columns=”max” order=”user” position=”center”]
1. white card stock papers
2. wallpaper or leather samples (or any kind of pretty papers you have in your disposal)
3. cutter and its base
4. two black Sharpie markers
5. ruler and pencil
6. glue
7. grid paper
How to Make
I usually make my DIY business cards in 2 sizes: the regular size (approximately 3.5 in. x 2 in.) and the slighty shorter version. The measurement varies by 1-2 mm for every batch I make, though.
[shashin type=”photo” id=”19017″ size=”xlarge” columns=”max” order=”user” position=”center”]
The regular size is the one I make the most. I happen to find a stack of white card stock papers in letter size (8.5 in. x 11 in.) that I forgot how and when I got them, so I gleefully measure and cut them to size.
[shashin type=”photo” id=”19015,19016″ size=”xlarge” columns=”max” order=”user” position=”center”]
Once they’re cut, I start lining one of them on a grid paper and set a ruler to aid my hand writing path. The DIY business cards I make have three lines: one for Fafafoom.com, the other two for my name and email address. The top line “Fafafoom.com” is written with a black Sharpie fine point marker, and the others are written with a black Sharpie extra fine point marker. That being said, sometimes I do all three lines with the black Sharpie extra fine point marker whenever I feel like it. I use the grid to help informing me of horizontal and vertical spacing between the lines, keeping them as centered as possible.
[shashin type=”photo” id=”19018,19019,19020″ size=”xlarge” columns=”max” order=”user” position=”center”]
Now, let’s add some texture on the back of the cards! First of all, let me say a little bit about the source of my materials. Once every few months, I go to a fabric rescue organization called Fabmo in the South Bay. They’re a wonderful non-profit organization that gathers designer fabrics, wallpaper samples, and leather samples, woods, tiles, etc from interior and exterior design companies, defunct apparel makers, and private donations. They hold “fabric selection days” each month where you can make an appointment to come in, select the fabrics (or anything else) you’d like, and leave money donation on your way out. I used to go there once every month or once per two months, but I refrain from doing so for the past three months since my fabric bins are full and my wallpaper / leather samples are still so plentiful!!!
Anyway, I select the wallpaper or leather samples I’d like to use for DIY business cards, and I cut them to size. I love them; they’re so pretty to touch and to look at!
[shashin type=”photo” id=”19021,19024″ size=”xlarge” columns=”max” order=”user” position=”center”]
Finishing up is easy breezy from here on. Glue the cut-out sample to the back of the card and voila! I have a new batch of Fafafoom business cards!
[shashin type=”photo” id=”19022,19023,19025″ size=”xlarge” columns=”max” order=”user” position=”center”]
Oh yes, I also created a bunch of the smaller sizes, too.
[shashin type=”photo” id=”19026,19027,19028″ size=”xlarge” columns=”max” order=”user” position=”center”]
When everything is said and done, I now have 38 regular and 25 small Fafafoom business cards stored in a pretty tobacco box (I bought it for $5 at a tobacco shop in San Mateo), ready to be given out to new friendly strangers!
[shashin type=”photo” id=”19029″ size=”xlarge” columns=”max” order=”user” position=”center”]
So that’s about it. I found the process fun, no matter how simple and straightforward it is. Projects like these help me calm my mind whenever I’m stuck with my sewing projects or with having a writer’s block. Coming out from making these DIY business cards, I’m much clearer at knowing what I will write for Fafafoom before the year’s end, so stay tuned!
Thanks for reading; until next time,
Musank