
I got an impulsive urge to do a quick DIY that involves no sewing (finally!) that results in romantic DIY flowers in boxes. It’s accidentally timely for a Valentine’s Day weekend.
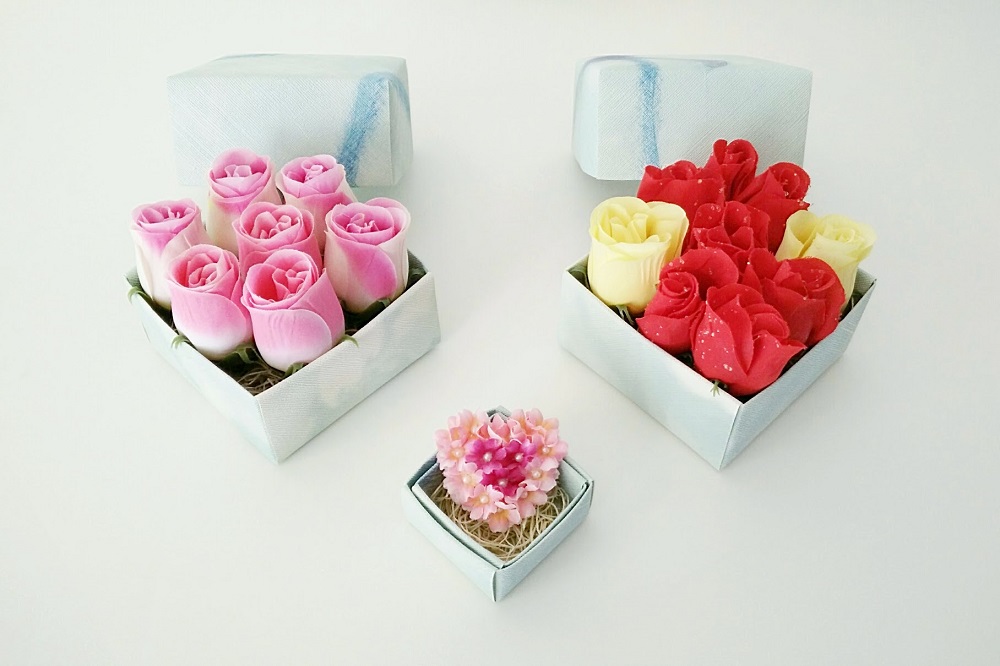
After reading Art & Sole, I got quite inspired to do a quick DIY project involving flowers. But an urge is nothing without any direction…until I saw DIY Boxed Flowers from a pair and a spare. That’s it; I was going to execute the same idea, except with artificial flowers. Fast forward to the morning of Valentine’s Day, I got these three pretty boxes on my table :)
[shashin type=”photo” id=”19845″ size=”xlarge” columns=”max” order=”user” position=”center”]
List of Materials
Having seen the first image of this article, you already know what’s inside those boxes: flowers. To be exact, silk flowers recycled from past Easter / Christmas decorations. The boxes themselves are made with wallpaper samples I got from Fabmo (where else?), and I learnt how to make them by visiting Fabmo Facebook page’s video section. I made them last weekend, so they’re ready for me to use!
All in all, I’m very happy I didn’t have to buy anything to complete this DIY Flowers in Boxes. Here’s my list:
1. wallpaper samples (from Fabmo)
2. silk flowers and petals (from past holiday decorations)
3. a “nest” of straws (from past holiday gift packaging)
4. Fabri-tac glue
First box: Pink Roses
First, I created the boxes using the handy instruction from Fabmo Facebook page’s video section. I cut my wallpaper sample into squares of approximately 26 – 27cm in length. The resulting box is about 8.5cm in length and 4.5cm in height. I have to say, the wallpaper samples have wonderful textures!
[shashin type=”photo” id=”19844″ size=”xlarge” columns=”max” order=”user” position=”center”]
Next, I cut my silk roses, leaving about 1 cm of stem for each. After “testing” the box’s capacity, it turns out that it can fit 7 of them easily.
[shashin type=”photo” id=”19843″ size=”xlarge” columns=”max” order=”user” position=”center”]
Taking a little bit of “nest” straws from a Christmas gift packaging, I put a thin layer of them on the base.
[shashin type=”photo” id=”19842″ size=”xlarge” columns=”max” order=”user” position=”center”]
Then I started arranging the roses, starting with the center. When I’m happy with each roses’ placements, I put a little glue on the stems so that they can stick better in the “nest” straws.
[shashin type=”photo” id=”19841″ size=”xlarge” columns=”max” order=”user” position=”center”]
And…ta-da! First box of pink roses done!
[shashin type=”photo” id=”19840″ size=”xlarge” columns=”max” order=”user” position=”center”]
Second box: Red and Yellow Roses
I cannot stop with just one box, so I created a second one. This box has 9 roses, so it looks a little bit cramped. But they still look pretty!
[shashin type=”photo” id=”19839,19838,19837″ size=”xlarge” columns=”max” order=”user” position=”center”]
I think I will gift this box to one of my close friends, so I also put some flower-scented bath salts on the base of the box so it smells nice :)
Third box: Little big heart brooch
I wasn’t planning on making this little one, but after reading a Japanese handcraft magazine “Chic Chic,” I just had to keep going! The additional materials for this little fella are:
– hand-drawn heart shape on a paper, cut
– thick paper as a base
– pink and purple silk cherry blossoms (from past holiday decorations)
– tiny plastic “pearls” (from past wedding decorations)
– black felt
– safety pin brooch bar
[shashin type=”photo” id=”19834″ size=”xlarge” columns=”max” order=”user” position=”center”]
Long story short, this last one was all about detail work. The box’s width is about 3.5 cm, so my heart brooch’s base is cut from a 3 cm square paper. Then, I glued the plastic pearls onto the middle of the tiny flowers, which I then glued to the thick paper. I did it one by one, trying to make a heart-shaped silhouette as much as possible. When I was done gluing tiny flowers onto a heart-shaped base, I turned it around and glued a heart-shaped felt. I finished it off with gluing the brooch bar.
[shashin type=”photo” id=”19831,19832,19833″ size=”xlarge” columns=”max” order=”user” position=”center”]
So there you have it! My DIY flowers in boxes look pretty romantic, no?
[shashin type=”photo” id=”19830″ size=”xlarge” columns=”max” order=”user” position=”center”]
I hope you all had a great Valentine’s Day weekend. Thanks for reading; until next time,
Musank
Trackbacks/Pingbacks