
This was one of my last DIY projects in 2012, but the zebra clutch conception began earlier this year when I pulled out a copy of Japanese magazine “Cotton Friend” Winter edition 2009 – 2010 vol. 33. There’s a how-to guide for a silk/linen purse with peacock feather embroidery on page 13 that’s really cute (and looked easy — more on that in a moment).
Then I remembered a friend gave me a “leftover” faux-fur zebra blanket, which was originally bought for making stage costumes (don’t ask). So with a little adjustment in the pattern, I made this zebra clutch with that faux-fur zebra at the outside and charcoal grey mid-weight cotton/rayon fabric with dull shine (I got a good size roll for $5 from ISDA and Co. outlet at South Park) combined with fusible interfacing for lining. Later on, I decided to add lace trim for finishing.
Below was the visual summary of the process, from cutting, the first decisive horizontal stitch, deciding which lace trim to use, to a finished zebra clutch.
First, here’s a glimpse of the cut-out pattern (marked with white chalk), the decisive horizontal stitch (thank you, low-tack masking tape), and the halfway results from front and back after stitching bias tapes on the sides:
[shashin type=”photo” id=”9437,9438,9444,9443″ size=”xlarge” columns=”max” order=”user” position=”center”]
Then, folding the clutch to make the right side out, plus choosing the lace trim for purse accent (the bottom right one ultimately won):
[shashin type=”photo” id=”9445,9446,9447,9448″ size=”small” columns=”2″ order=”user” position=”center”]
Attaching the magnetic clasps (thank you Craft Apple for providing the instructions!) and stitching the trims prove to be accuracy and detail test, but I’m happy with the result:
[shashin type=”photo” id=”9440,9441″ size=”xlarge” columns=”max” order=”user” position=”center”]
And since I like having the option to be hands-free, I added a black hook on the inside left corner of the clutch so I could attach my horse hair bracelet (bought at Crater Lake, Oregon gift shop). I can either use the bracelet as a handle or wear it to avoid dropping my zebra clutch:
[shashin type=”photo” id=”5232,5233″ size=”xlarge” columns=”max” order=”user” position=”center”]
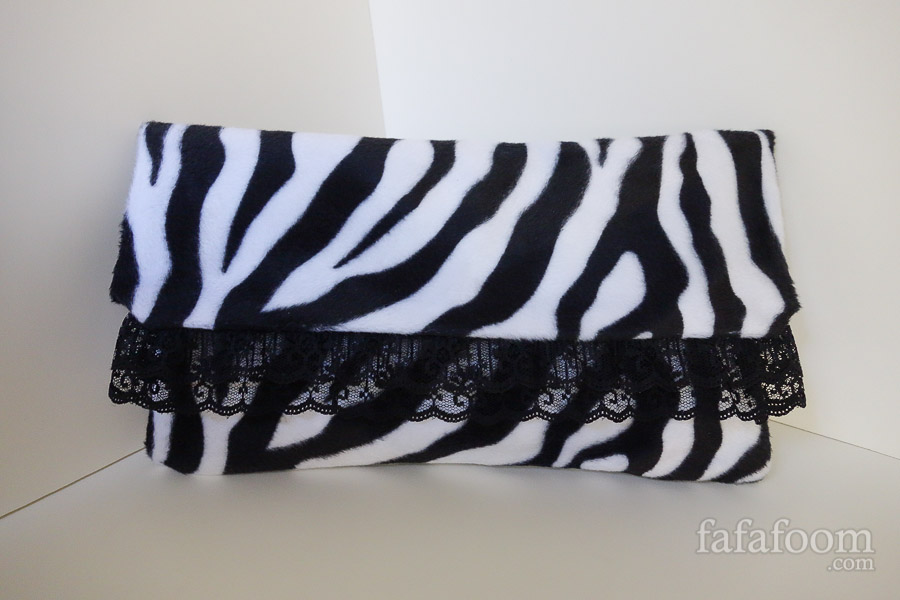
All in all, I got a very cute zebra clutch at the end, but it was not an easy process for me. Granted that I am a beginner sewer and took much longer time than a more experienced one (who can probably whip this up in less than one hour). But I don’t want beginner sewers to get discouraged; this project thought me a lot about appreciating details and finishing, as well as symmetry and clutch form.
[shashin type=”photo” id=”5229″ size=”xlarge” columns=”max” order=”user” position=”center”]
Let me know if you want the how-to guide; I can scan the page and put it up here. Kudos for handbag makers everywhere…mad respect for their craftsmanship.
Below is my summary of what I found easy and not so easy doing this project. Again, this is relative to my sewing skill (which is not much). Rather than discouraging beginner DIY project makers, the lists below is more about what to expect going into this project.
- The pattern pieces were rectangular; very easy to make, mark, and cut.
- Following the picture guide was very easy even if you don’t understand any Japanese.
- The result was a cute clutch that has adequate room inside for your essentials.
- Making the first horizontal stitch was key, and it scared me a little whether I got the clutch’s height right.
- There’s quite a bit of time-consuming hand-stitches, as well as bias tape stitching.
- Finishing off the purse magnets and lace were a bit more challenging than I expected.
Once again, let me know if you want the how-to guide, either by leaving a comment or email me. And while you’re at it, what are your favorite clutch / purse / handbag DIY projects? Share with us please!
Thanks for reading. Until next time,
Musank
Trackbacks/Pingbacks