
Turning my old wedding shoes into a DIY mesh covered white flats. Thanks to Mod Podge, the pair of shoes is looking so much better with added mesh texture!
The pair of white flats I wore on my Jakarta wedding in 2013 was a hot mess after the wedding day ended. It had bumps and bruises, and I couldn’t erase them with some cleaning and polishing. They got stuck in my closet, and I couldn’t bring myself to wear them outside…until now.
[shashin type=”photo” id=”20663″ size=”xlarge” columns=”max” order=”user” position=”center”]
I felt that it’s time to do another modpodge shoes after DIY Glitter Shoes project back in 2012. This time, instead of glitters, I used white mesh polyester fabric to cover my white flats for added texture. I was thinking a resort-ready type of white flats, and I believe I accomplished what I set to do in the first place. My DIY Mesh Covered White Flats look gorgeous, and I’m ready to rock them sometime soon. The whole thing took about three hours, including the short waiting periods in between Mod Podge layering steps.
[shashin type=”photo” id=”20689″ size=”xlarge” columns=”max” order=”user” position=”center”]
Materials
In addition to my pair of white flats, I have the following items:
1. Two pieces of fat quarter (18 in. x 22 in.) white polyester mesh fabric – my shoes are size 9; a fat quarter fabric is plenty for one shoe
2. Mod Podge Gloss Lustre / Outdoor
3. Fabri-Tac glue
4. White bias tape
5. Cutter, scissors
6. Tooth picks
7. (optional) Shoe clips and bow decorations
8. (optional) Masking tapes or washi tapes
[shashin type=”photo” id=”20662″ size=”xlarge” columns=”max” order=”user” position=”center”]
The how-to steps from Make It & Love It’s “Modge Podge Shoes” article was such a great help. It’s an especially awesome reference to have when dealing with the shoes’ curves. However, since I use a white mesh fabric to cover the shoes, I use Fabri-tac to glue some difficult spots. Without further ado, read below for my step-by-step DIY mesh covered white flats project!
Prep Work and First Coat
It’s important to start with a clean slate for this project. So I cleaned up my flats with half-damp paper towels. Then I applied some washi masking tape on the inside of the shoes opening so they didn’t feel unnecessarily sticky. On the picture below, I did the same on the heels and wooden part of the outer sole. But later on, I undid this and eventually used Mod Podge on that area.
[shashin type=”photo” id=”20661″ size=”xlarge” columns=”max” order=”user” position=”center”]
After one coat of Mod Podge, the flats had a subtle sheen on them.
[shashin type=”photo” id=”20660″ size=”xlarge” columns=”max” order=”user” position=”center”]
Second Coat: Fabri-tac Enters
This is where Fabri-tac started playing its part. I applied just enough Fabri-tact to the toe points and placed the center of one polyester mesh starting from the toe edge. I put on one more coat of Mod Podge before gently pressing the polyester mesh to the whole front area of the shoes. After that was finished, I started making a slit in the middle of the mesh so they can be molded better to the sides of the shoes without any puckering / pulling.
[shashin type=”photo” id=”20659″ size=”xlarge” columns=”max” order=”user” position=”center”]
Third Coat: Shaping and Trimming the Mesh
This was when I started applying Mod Podge more heavily to the shoe sides. Plus, I started trimming the polyester mesh on the shoe openings and the back.
[shashin type=”photo” id=”20658″ size=”xlarge” columns=”max” order=”user” position=”center”]
This was what a shoe looked like after I finished trimming excess mesh fabric, leaving about 1/2 inch extra around the shoe opening and back.
[shashin type=”photo” id=”20657″ size=”xlarge” columns=”max” order=”user” position=”center”]
To trim off excess mesh at the bottom of the shoes, I used a cutter to carefully cut them next to the main sole.
[shashin type=”photo” id=”20656″ size=”xlarge” columns=”max” order=”user” position=”center”]
I also used a tooth pick for each shoe to help me mold the mesh on tricky curves, like the lower back of the shoes and heels. I added little doses of Mod Podge as necessary.
[shashin type=”photo” id=”20649″ size=”xlarge” columns=”max” order=”user” position=”center”]
Fourth Coat: Tucking In the Mesh Inside + Finishing Touches
This is when I added a thin layer of Mod Podge on top of the polyester mesh. I also made slits and tucked in the mesh inside the shoe opening using Fabri-tac.
[shashin type=”photo” id=”20655,20653″ size=”xlarge” columns=”max” order=”user” position=”center”]
Because the polyester mesh doesn’t feel good in contact with my skin, I glued some white bias tape on the inside edges of the shoes.
[shashin type=”photo” id=”20650″ size=”xlarge” columns=”max” order=”user” position=”center”]
(Optional) Decorating the white flats
I hesitated adding more embellishment to the shoes at this point. Yes, originally I wanted to add lace bows on them, but I wasn’t sure anymore. After asking for your wisdom on Instagram and Facebook, I ended up purchasing a pair of shoe clips so I can glue the bows on them. After all, I’d like to create options for wearing these flats.
Alas, I ended up not doing it because the shoe clips are a little too large for the bows’ middle section. But I’m sure I can use the bows and shoe clips for later use!
[shashin type=”photo” id=”20645,20647″ size=”xlarge” columns=”max” order=”user” position=”center”]
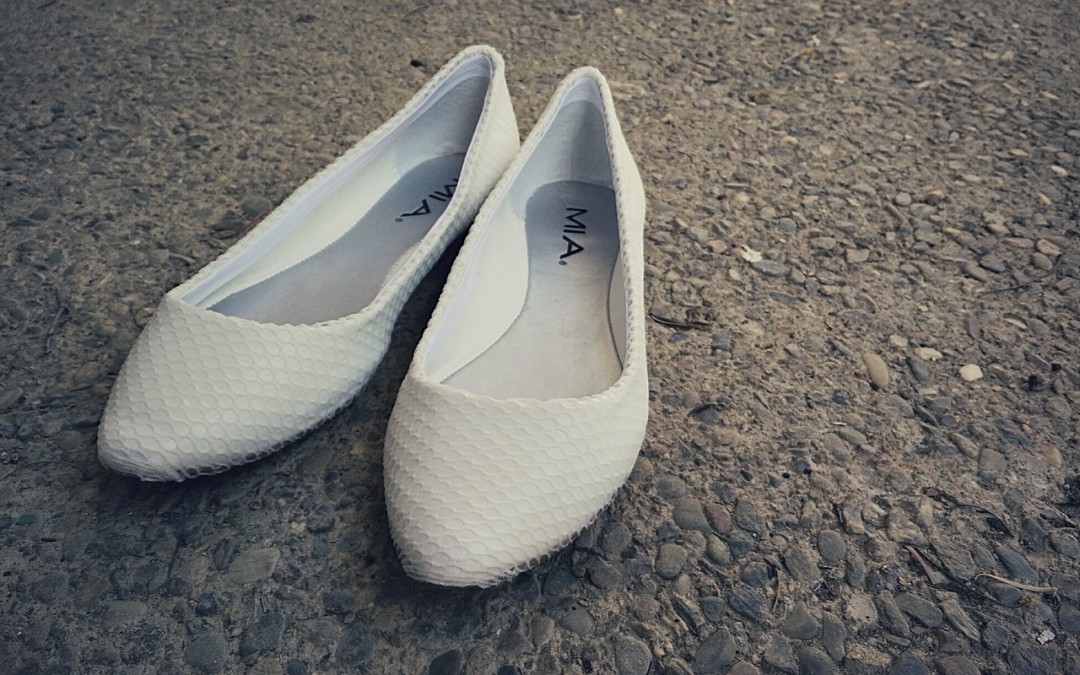
More shots of the finished shoes
So, that’s it! I’m really happy with the result and I can’t wait to rock them with some white cropped pants, t-shirt and oversized denim shirt for a casual look. Or I can go more preppy with a black and white shift dress! Here are more shots of the pair, perhaps you can examine some of the details a little bit better.
[shashin type=”photo” id=”20648,20643,20639,20640,20641,20642,20644″ size=”xlarge” columns=”max” order=”user” position=”center”]
Thanks for reading; until next time,
Musank
I like the flats with the black bows on them for the added contrast.
Yes Agy, I think it’s cute that way, but it’s too bad the shoe clips are too big.
Love your updated shoes with the mesh & black bow clips!
Thank you Joy! I’m so excited to wear them again this spring!