
I started making handmade cards last 2014 holiday season using wallpaper samples. I was reminded to the preciousness of handmade gifts, so I plan to make more of them in the future for all occasions.
First of all, I’d like to say something that’s been weighing my mind. I wanted to publish this post prior to New Year, however I decided to delay it due to Air Asia QZ8510 incident. The prior MH370 and MH17 incidents were tragic, but QZ8510 tragedy hit a little bit too close for comfort. While I did not lose any family members or relatives in this incident, I have friends and acquaintances who lost their relatives. One friend lost his uncle and the rest of his family (the uncle’s wife and two children), and I can only imagine my friends’ distress, shock, and profound sadness of all who are affected to this tragedy. These people were going to a vacation in Singapore for the holidays, and they lost their lives instead.
Initially, I intended to title this post “DIY Holiday Cards.” It’s a festive season and I wanted to show cards I made for some of my closest friends. But after I learnt about the incident, I was feeling less and less festive every day that I almost decided to pull this post altogether. However, I felt that the receptions I get from those who receive these cards were extraordinarily warming, so I decided to publish this post after all, albeit late.
Making these cards were so much fun; not only the process was quick, but also the results were so precious and cool that I couldn’t wait to give them to my friends. Therefore I will continue to make these handmade cards for many special occasions, not just during the holiday season, as much as my free time allows. I hope you enjoy this DIY Handmade Cards post and please keep the victims and families of QZ8510 tragedy in your prayers. May God give them abundant blessing and strength in this undoubtedly difficult new year to swallow. God bless.
Materials
1. sample wallpapers (you don’t think I’m done with them, do you?)
[shashin type=”photo” id=”19059,19060″ size=”xlarge” columns=”max” order=”user” position=”center”]
2. white card stock papers
3. “leftovers” from other DIY Projects (anything was game for me: fabric flowers, Christmas ornaments, glitter glue, scrap wrapping papers, ribbons, etc.)
4. Fabric-tac glue (the MVP of this DIY Handmade Cards project)
5. Stamps and Tsukineko’s VersaColor ink pads (I’m so into stamps these days, I can’t get enough of them!)
6. Scissors
7. Sewing machine
8. Card envelopes (either spare envelopes or the packs you can buy at local printing shops)
The Basic: Assembling the Cards
After eyeballing the envelope’s measurements, I started cutting the wallpaper samples to size. Its width is slightly less than twice the height of the envelope’s, and the height is slightly less than the envelope’s width.
[shashin type=”photo” id=”19061″ size=”xlarge” columns=”max” order=”user” position=”center”]
Then I did the same with the white card stock paper. I need the card stock paper since the wallpaper sample is too flimsy by itself.
[shashin type=”photo” id=”19062″ size=”xlarge” columns=”max” order=”user” position=”center”]
I then stack the wallpaper sample (textured side down) and the white card stock paper, and sew the middle “spine” with my sewing machine. After the spine was done, I glued the wrong side of the wallpaper sample to the white card stock paper.
[shashin type=”photo” id=”19063,19064″ size=”xlarge” columns=”max” order=”user” position=”center”]
And that’s it! The blank greeting cards were basically done and they already looked so pretty with their textures…but I didn’t stop here.
[shashin type=”photo” id=”19065″ size=”xlarge” columns=”max” order=”user” position=”center”]
The Fun Part: Decorate, Decorate, Decorate!
For the lavender colored card, I cut various triangle shapes on my leftover sheer fabric. I then glued them on, and finished it with some white glitter glue on three of the triangles. I was imagining snow-covered trees at Yosemite National Park. My hands were messy with glue afterwards, but the recipients loved the card, so it’s all worth it!
[shashin type=”photo” id=”19068,19069″ size=”xlarge” columns=”max” order=”user” position=”center”]
I basically did the same idea with the flower patterned card; the only differences were the more traditional Christmas tree shape, the gold and red glitter glue (leftover from my Glitter Shoes days), and the gold ribbon glued near the bottom of the card.
[shashin type=”photo” id=”19066″ size=”xlarge” columns=”max” order=”user” position=”center”]
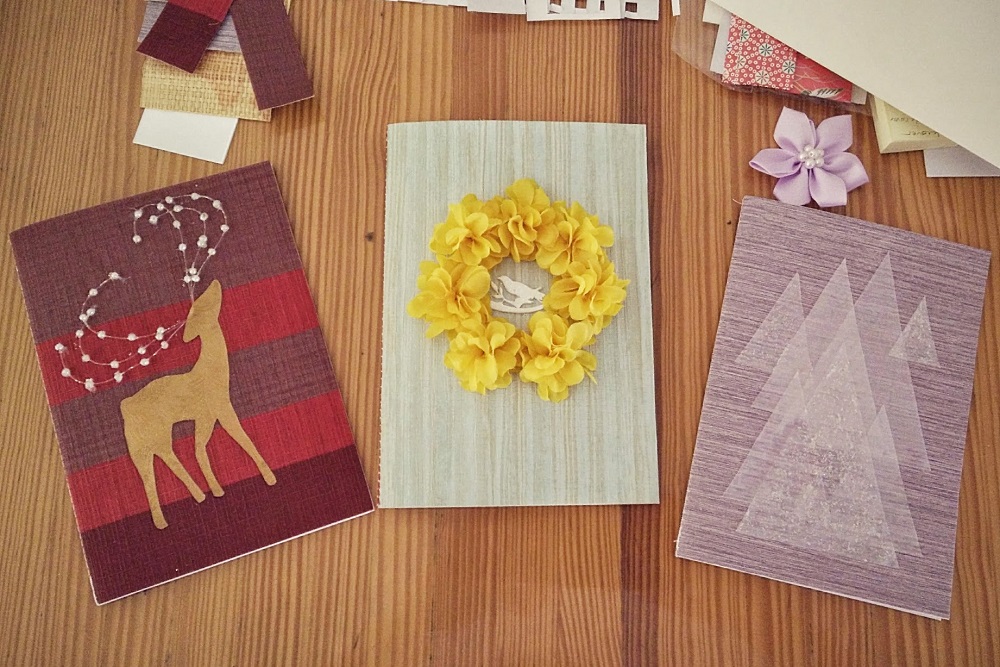
This red stripes card was decorated with cut-out reindeer shape (I mimicked the pattern from an old shopping bag) on a gold wrapping paper, and the horns were made with leftover wedding hair accessories decoration that did not make it to my DIY Birdcage Veil‘s final result. There’s actually another reindeer (in mirror image) on the back of the card that you couldn’t see here. Gluing those little plastic balls in place was rather difficult, but the finished card turned out really nice! The recipients were happy :) Oh, and I also glazed some white glitter glue on those horns to give a nano dose of sparkles.
[shashin type=”photo” id=”19067″ size=”xlarge” columns=”max” order=”user” position=”center”]
On the picture below, the blue one in the middle was decorated with leftover yellow flowers from DIY Flower Accessories and a plastic bird shape from a friend’s craft workshop. I almost couldn’t fit this card in the envelope! But it’s super pretty and totally fit the personality of the recipient. Since all of the flowers were done, only gluing was necessary for me at the time. And if you asked whether I dusted some white glitter glue on the bird, the answer’s yes.
[shashin type=”photo” id=”19071″ size=”xlarge” columns=”max” order=”user” position=”center”]
I also created a card with a different dimension; one that fits the long envelope you usually stuff checks in (I wish!). This one was decorated with three ornament cut-outs (thank you Homemade Gifts Made Easy for the free patterns!), red threads (sewed on two layers of paper – the wallpaper and the card stock), little red ties made from loose red fringe, and white rectangles stamped with a Karaku rubber stamp (those stamps are AWESOME) and Tsukineko VersaColor in Royal Blue.
[shashin type=”photo” id=”19084,19085″ size=”xlarge” columns=”max” order=”user” position=”center”]
Greeting Cards, No Envelopes Necessary
Somewhere down the line of making these cards, I wanted to make several that require no envelopes. I mean, the textures of these wallpaper samples are drop dead gorgeous and I wanted to showcase them more. So I started taking the yellow wallpaper and make it so that it wrapped around a 8.5″ x 11″ white card stock paper after I sewed the middle spine. I sewed the sides and applied some glue at the bottom of the card, as well as sewing a couple of nylon snaps for closure.
[shashin type=”photo” id=”19073,19074,19075,19076,19077,19078,19079,19081,19080″ size=”xlarge” columns=”max” order=”user” position=”center”]
Voila, a no-envelope blank greeting card!
[shashin type=”photo” id=”19082″ size=”xlarge” columns=”max” order=”user” position=”center”]
I ended up making more of this no-envelope style, albeit with slightly smaller size and no snaps. I used ribbons and thin leather strips instead to cut my production time in half (hey, I’m a product manager, after all).
[shashin type=”photo” id=”19083″ size=”xlarge” columns=”max” order=”user” position=”center”]
Anyway, I love making both versions of handmade cards. I really appreciate the rich colors and textures of the wallpapers, and I absolutely plan to go back to Fabmo to get more wallpapers. With all the handmade card making I’m planning to do this year, I will need a good stock in my drawer! What do you think? Which version do you like more?
And would you like to receive blank greeting cards made from these wallpaper samples and card stocks from me?
Thank you for reading; until next time,
Musank
What an absolutely awesome idea! I am an avid fan of the lost art of letter writing (and all things paper) so I am in awe that you made these cards/envelopes yourself, from wall paper. And, of course, I love that you send cards. Lovely to meet you.
Thank you so much, Barb! I love papers too, I want to treasure them as much as I can before they become (like you said) part of the lost art. It’s so lovely to meet you too, and I’m so glad I discover your blog!